Tuesday 11 May 2010

Final Presentation

Final Images
I have chosen to get my final prints printed on 10 by 8 photographic paper.
I have received these back and I am pleased with the final result.
I chose to show my final images as seperate prints and I decided against creating a book or putting them into a professional final presentation box.
I managed to combine 10 - 12 final images together to show the intention i wanted for this project.
I like the way I have been able to enhance an image
to make it more realistic to the human eye.
Although a digital camera captures an image as it is in real form, i chose to enhance the colours within the final images to make them appear to be more intriging to the eye.
Written work has now been completed;
i will be looking through incase any adjustments and amendments are needed.
x

Thursday 6 May 2010

Additional Contact Print

For this contact print I wanted to work on depth of field. I also experimented with my Macro Lens and I am pleased with a number of results.
I like the vibrancy of the pink which is drawn out of the flowers.
The blurred background helps me to achieve an interesting concept and I love the idea of focussing on the centre of the flower and then another shot focussing on the petals.
I have realised that; from this contact print, that the shots which work best focus on the centre of the flower.

Tuesday 4 May 2010

Final Images

I have been shooting on digital for a while now producing a series of
different images on the idea I was working on.
I bought a Macro lens last week so I took a few shots with that and now have 10 final images which will be printed.
I have decided to keep the final prints as a individual basic print as
i dont want to over complicate the idea behind
the photographs.

Tuesday 27 April 2010

Additional Edits

The edited images will be the ones i choose to get printed for this project


This is the original photo


And this is the edited version;
As you can tell from the above image, the edited image has been edited in a noticeable way.
I have changed the colour of the surrounding area around the daffodil as I felt the previous image lacked colour; i think that this edit has helped to enhance the whole composition.
I have also managed to enhance the colour of the yellow and green on the daffodil.
With some simple techniques in changing the appearance of this image I feel as though I have been able to make the photograph more appealing.


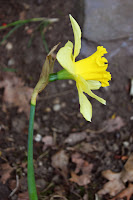
I decided against using the 'Auto Colour' option for this photograph as the image afterwards appeared too blue.
I think that although I have made some changes to the original image, the flower still appears natural.
I also used the 'Image-Adjustments-Brightness and Contrast' to make
the whole image stand out more

This is the original photo


And this is the edited version;

From looking at these images from a distance, there isn't much change that it noticeable.
However I have made some adjustments to the 'Brightness and Contrast' within the image which has helped to draw the flower closer to the foreground of the composition.
I have also used the clone stamp to remove some dirt from the outline of the flower. This has enabled me to create a cleaner composition.
I decided to enhance the colour of green within the image as I felt this area needed to be made more evident in the whole composition.
The depth of field I have used here foccuses on the orchid in the foreground of the composition.
The green grass in the background is blurred to give the composition an interesting effect.

I think that this one works well and related so my research by Terri Weifenbach.
The idea of using minimal whiteness in the background helps draw the viewer closer towards the flower.

Monday 26 April 2010

A few edits

This image is the original photo


This is the edited photo.


I used Photoshop cS3 to make some edits to the original images, i wanted to enhance the colours within the composition.
To do this i used the 'Image - Adjustments - Curves..' tool.
This enabled me to make the flower brighter and the background darker. I wanted the flower to stand out almost instantaneously.


The colours in the background have also been enhanced.
To do this i went to 'Image - Adjustments - Auto Color'. I then selected 'Colour Balance' which allowed me to add a hue of red in the background.

This is the original image


This is the edited image below;
For this edit in Photoshop i decided to use some of the same techniques i used for the previous edit. I liked the idea of making the flower stand out more against the background so i implied the same technique here. However I have added a pink hue to the magenta within the image on this one.
The grass has also been edited to make the green more vibrant; i did this by selecting 'Images - Adjustments - Color Balance' and adding some colour to the highlights and shadows within the composition.

The original image lacked vibrancy within the colour of the flower and i wanted to enhance the vibrancy which I feel i have been able to acheive.


Edit to Previous Poster Design

This is my edit for the previous poster design i had made for this project.
I took on board the comment i had in regard to this poster design and have changed the selection of images to all colour focussing on flowers using depth of field.

I would appreciate peoples opinions on this one as this could be a possibility for my final design.


This is the draft for our whole exhibition poster below:


The small boxes underneath the large image indicates where the smaller images will go from each student.
I like this idea as it is clean and simple and has a balance of both positive and negative space which makes the whole poster more appealing.

Sunday 25 April 2010

Contact Prints


Contact Prints


Experimentation 2

These next contact prints have been shot today with minimulistic sunlight; which restricts the natural light i had.
I wanted to photograph a number of flowers within one area to show different colours and compositions.
I wanted to capture the weather within these shots, given the idea of focussing on the water droplets in some of the image.
I think this idea has been expressed well, however i feel that it works better on the green plants rather than the colourful flowers.

With the camera lens that I was using; a standard 55mm lens I wasn't able to get as close to the subject matter as I had hoped. Although i do feel as though I was able to shoot a good range of images using the technique of depth of field.

The purple orchid and pink flowers have worked best to show a variation of different colours within this contact print.
I like the depth of field used on the pink flowers as it shows how delicate each flower is.
On a closer look, i can see how detailed the shots are; the pink flowers have a formation of a heart which helps to give these flowers a more interesting meaning.

Opinions?